Filleting fish is a fundamental skill for any aspiring home cook or seafood enthusiast. The proper technique not only ensures clean and boneless fillets but also maximizes the yield from your fish.
In this step-by-step micro-guide, we will walk you through the process of filleting fish with a fillet knife. Follow along and master this essential culinary skill.
In This Article
- Choosing the Right Fillet Knife
- Preparing the Fish
- Setting Up Your Workstation
- Step-by-Step Filleting Technique
- Removing the Skin
- Removing the Bones
- Tips for a Clean Fillet
- Safety Precautions
- Cleaning and Maintenance of Your Fillet Knife
Choosing the Right Fillet Knife
Selecting the ideal fillet knife is the cornerstone of your filleting journey. Let's delve into the art of choosing this essential tool:
- Seek the Perfect Blade: Envision a knife with a blade that's long, slender, and dances with flexibility. This isn't just any blade; it's your partner in the delicate dance of filleting. Its length should harmonize with the size of your typical catch, while its flexibility allows for graceful maneuvers around bones and contours.
- Understand Your Needs: Each fish tells a different story, and your knife should be attuned to these tales. A larger fish demands a longer blade, a testament to the need for a tool that adapts to your culinary adventures.
- Feel the Handle: The handle is more than just a grip; it's where your hand meets the soul of the knife. It should feel like an extension of your arm, offering comfort, control, and confidence with every slice.
Dive Deeper into the World of Fillet Knives: For those hungry for more knowledge, our comprehensive article on choosing the perfect fillet knife awaits. It's a treasure trove of insights, guiding you through the nuances and intricacies of selecting a fillet knife that resonates with your culinary spirit.
Preparing the Fish
Proper preparation is the first step to masterful filleting. Imagine your kitchen counter transforming into a professional fishmonger's station. Here's how to get your fish ready for a flawless filleting experience:
- Clean and Scale: Begin by thoroughly cleaning your fish. Imagine the cool splash of cold water as you rinse it, ensuring every inch is free from scales and debris. Feel the fish's firmness and texture as you handle it.
- Pat Dry: Gently pat the fish dry with paper towels. Picture the towels absorbing every droplet of water, leaving the fish's skin perfectly prepped and dry, ready for your skilled hands.
- Fin Trimming: If your fish still sports its fins, it's time for a trim. Use your kitchen shears with precision, snipping off the fins. Visualize each cut as a step closer to the perfect fillet.
- Hygienic Setup: This step is crucial for a clean and hygienic filleting process. Envision your workspace as a testament to cleanliness, setting the stage for the culinary art you're about to perform.
Setting Up Your Workstation
Crafting the perfect workstation is key to a seamless filleting journey. Let's transform your kitchen space into a filleting haven:
- Gather Your Tools: Start by assembling your filleting arsenal. Picture your fillet knife, its blade glinting under the kitchen lights, alongside a sturdy cutting board and a clean towel. Each item plays a pivotal role in the art of filleting.
- Stabilize Your Board: Place a damp towel beneath your cutting board. This simple trick is a game-changer, preventing any unwanted slips or slides. Imagine the board firmly anchored, offering a stable platform for your precise cuts.
- Optimize Lighting: Ensure your workspace is bathed in ample light. Good lighting is not just practical; it's essential. It illuminates every scale and texture, guiding your knife with precision and care.
Creating an Ideal Environment: Your workstation is more than just a space; it's where culinary magic happens. Take a moment to appreciate the setup, feeling the anticipation of the task at hand.
Step-by-Step Filleting Technique
Now, let's dive into the step-by-step filleting technique. Follow these instructions carefully for optimal results:
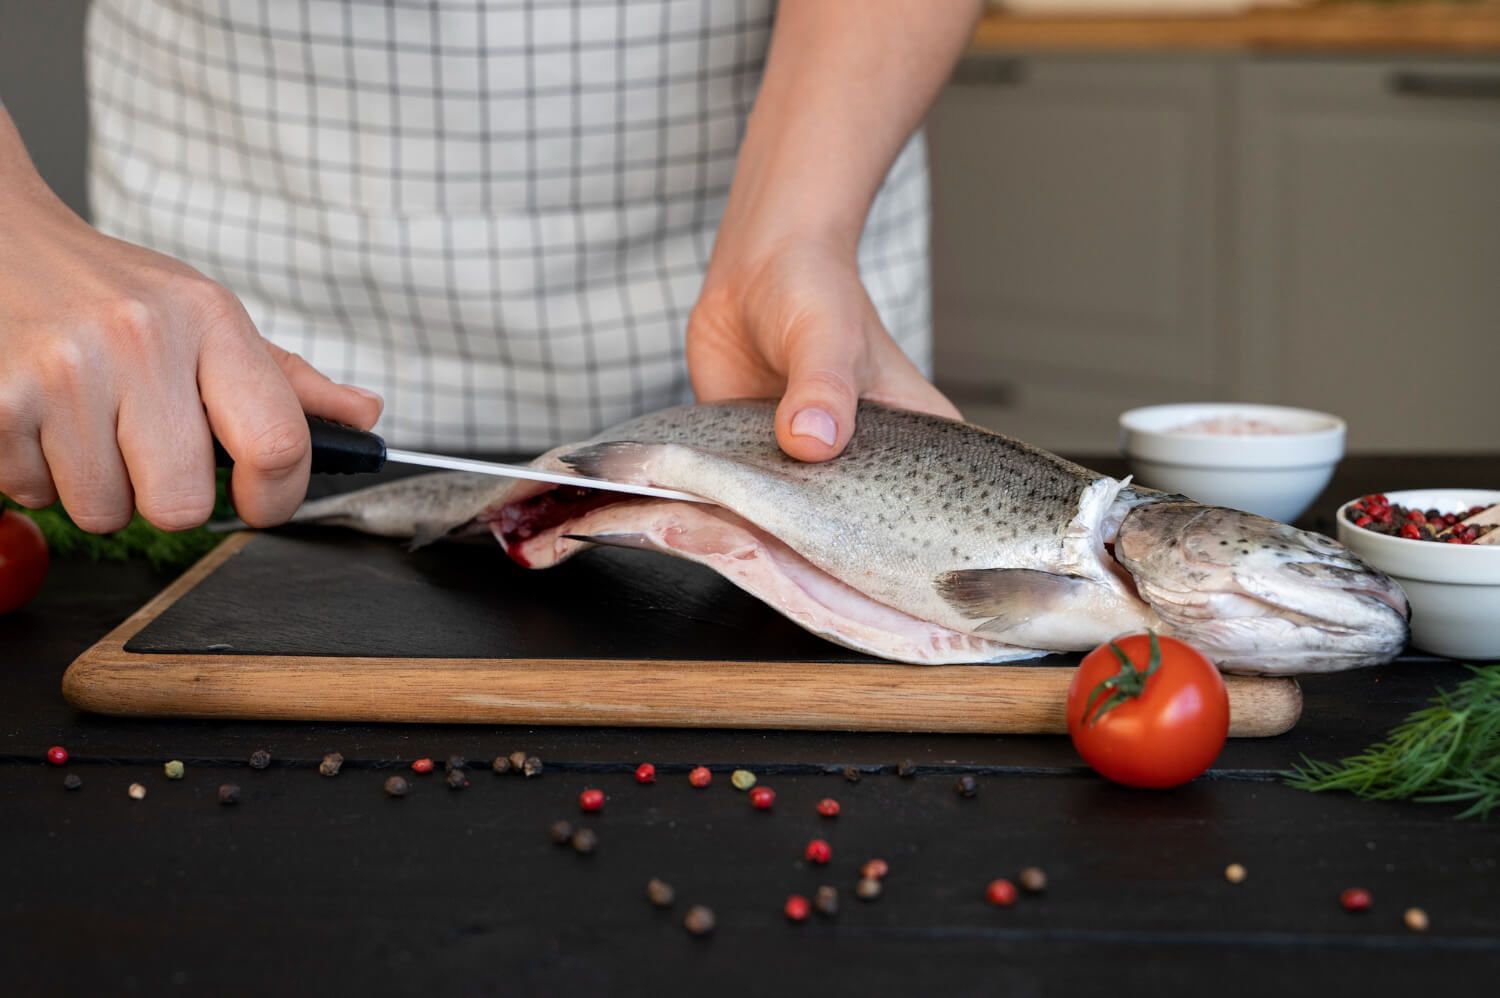
- Initiate with Precision: Position your fish on the cutting board, belly facing down. Imagine the fish's story, from the ocean to your kitchen. Start at the tail end, crafting a shallow incision just behind the gills, parallel to the backbone. This initial cut is the gateway to your filleting adventure.
- Guide Your Blade with Care: Introduce your fillet knife into this incision, angling it towards the fish's head. Picture the knife as an extension of your hand, gracefully following the backbone. Employ smooth, controlled strokes, letting the fish's natural structure lead your blade, separating the flesh from the bones with respect and precision.
- Continue with Rhythm: Now, dance along the length of the fish, maintaining a harmonious distance between the blade and the backbone. Imagine a gentle sawing motion, akin to a conductor's baton, keeping the blade close to the rib bones. This technique is about extracting as much flesh as possible, honoring the fish's journey.
- Flip and Echo the Process: After one side is masterfully filleted, it's time to mirror your artistry. Carefully flip the fish, treating it with the reverence it deserves, and replicate the filleting process on the other side.
Removing the Skin
Removing the skin from your fillets is a delicate process that requires finesse and precision. Here's how to do it effectively:
- Start at the Tail: Position the fillet with the tail end closest to you. Carefully insert the tip of your fillet knife between the flesh and the skin, starting at the tail. Angle the blade slightly downward to ensure it stays close to the skin.
- Firm Grip: With your non-dominant hand, hold the tail end of the skin firmly. This grip is crucial for maintaining control as you separate the skin from the flesh.
- Controlled Separation: Using a gentle sawing motion, slide the knife away from you, along the length of the fillet. Keep the blade angled slightly downwards and move steadily to ensure a clean separation of skin from flesh.
- Repeat for the Second Fillet: Once you've successfully removed the skin from the first fillet, turn your attention to the second. Repeat the process, ensuring you maintain the same level of care and precision.
Removing the Bones
To achieve boneless fillets, meticulous removal of any remaining bones is crucial. Here's how to ensure your fillets are perfectly bone-free:
- Locate the Pin Bones: Carefully run your fingers along the fillet's surface to feel for any pin bones. These small, thin bones typically extend vertically from the flesh and can be tricky to spot.
- Use Tweezers or Fishbone Pliers: Once you've identified a pin bone, use a pair of clean tweezers or specialized fishbone pliers for precision. Grasp the bone firmly at its base.
- Pull Out the Bone: With a steady hand, gently but firmly pull the bone in the direction opposite to its growth. This ensures complete removal without tearing the flesh.
- Repeat the Process: Continue this meticulous process along the length of the fillet. Feel for any hidden pin bones and remove them one by one to ensure a completely boneless experience.
Tips for a Clean Fillet
Achieving a clean, professional-looking fillet is an art. Here are some tips to refine your technique:
- Practice Makes Perfect: Mastery in filleting fish comes with practice. Don't be disheartened by initial challenges; each fillet improves your skill.
- Maintain a Sharp Knife: A sharp fillet knife is crucial. It ensures precision and safety, reducing the risk of accidents caused by unnecessary force.
- Take Your Time: Patience is key in filleting. Rushing can compromise the quality of your fillet. Focus on clean, deliberate cuts and careful bone removal.
- Keep the Blade Clean: Regularly clean your blade with a damp cloth or under running water. This prevents the buildup of scales or flesh and maintains the knife's efficiency.
Safety Precautions
When handling sharp knives, especially during the filleting process, prioritizing safety is essential. Here are key safety precautions to observe:
- Secure Your Workstation: Ensure your cutting board is stable. Placing a damp towel underneath can prevent any slipping, providing a secure surface for filleting.
- Proper Hand Placement: Maintain a firm grip on both the fish and the fillet knife. Keep your fingers away from the blade's path. Adopting a claw-like hand position when guiding the blade can offer added control and safety.
- Use Caution When Applying Pressure: Apply even, controlled pressure during the filleting process. Avoid excessive force, which can cause the knife to slip, potentially leading to injury.
Cleaning and Maintenance of Your Fillet Knife
Proper care and maintenance of your fillet knife are crucial for its longevity and performance:
- Hand-Wash Only: To preserve its edge and finish, avoid using a dishwasher. Hand-wash your fillet knife with warm, soapy water, rinse thoroughly, and dry it immediately to prevent rusting.
- Store Properly: Keep your fillet knife in a knife sheath or a protective cover. This not only prevents accidents but also helps maintain the blade's sharpness.
- Regular Sharpening: Regularly hone and sharpen your fillet knife. A well-maintained edge ensures clean cuts and efficient filleting.
Mastering fish filleting with a fillet knife is a rewarding culinary skill. By following these steps, you'll achieve precise, boneless fillets. Remember, the right knife, a well-set workstation, and safety practices are key. With patience and practice, you'll soon fillet fish like a pro, enjoying the satisfaction of preparing fresh, delicious fish with skill and confidence.
Further Reading
- For those in search of a new fillet knife or seeking their first one, we invite you to explore our article highlighting the best fillet knives. Discover our top 5 recommendations to assist you in making the perfect choice for your culinary adventures.
- For a deeper understanding of the differences between a fillet knife and a boning knife, and how to choose the right one for your needs, be sure to check out this detailed guide at Dalstrong's blog.
Thanks for reading!